.png?width=200&height=200&name=dovetail%20workmarklogo%20(1).png)

Project information is almost never only in one document.
The approved plan might be in SharePoint. The budget is in Excel. A key decision is buried in an email. The latest actions are sitting in meeting notes or a Teams transcript.
A Copilot Notebook lets you bring those sources into one focused workspace. You can then ask questions to Copilot about them without having to add them back into the chat every single time.
This guide shows you how to set one up using “Project Nimbus” as an example.
What you will create
By the end, you will have:
- A clearly named Copilot Notebook
- A small set of reliable project references
- Instructions that control how Copilot answers
- A project briefing grounded in those sources
- A simple way to check whether the answer is accurate
Before you begin
Choose an active project with information spread across Microsoft 365.
For your Project Notebook the starting references could include:
- The approved project charter
- The current project plan
- The budget tracker
- The latest status update
- An email containing an important decision
- Recent meeting notes or a transcript
Start with five or six useful sources. Do not add every file connected to the project.
Current, approved information is more useful than a large collection of old drafts.
Creating the Project Notebook
Step 1: Create the Notebook
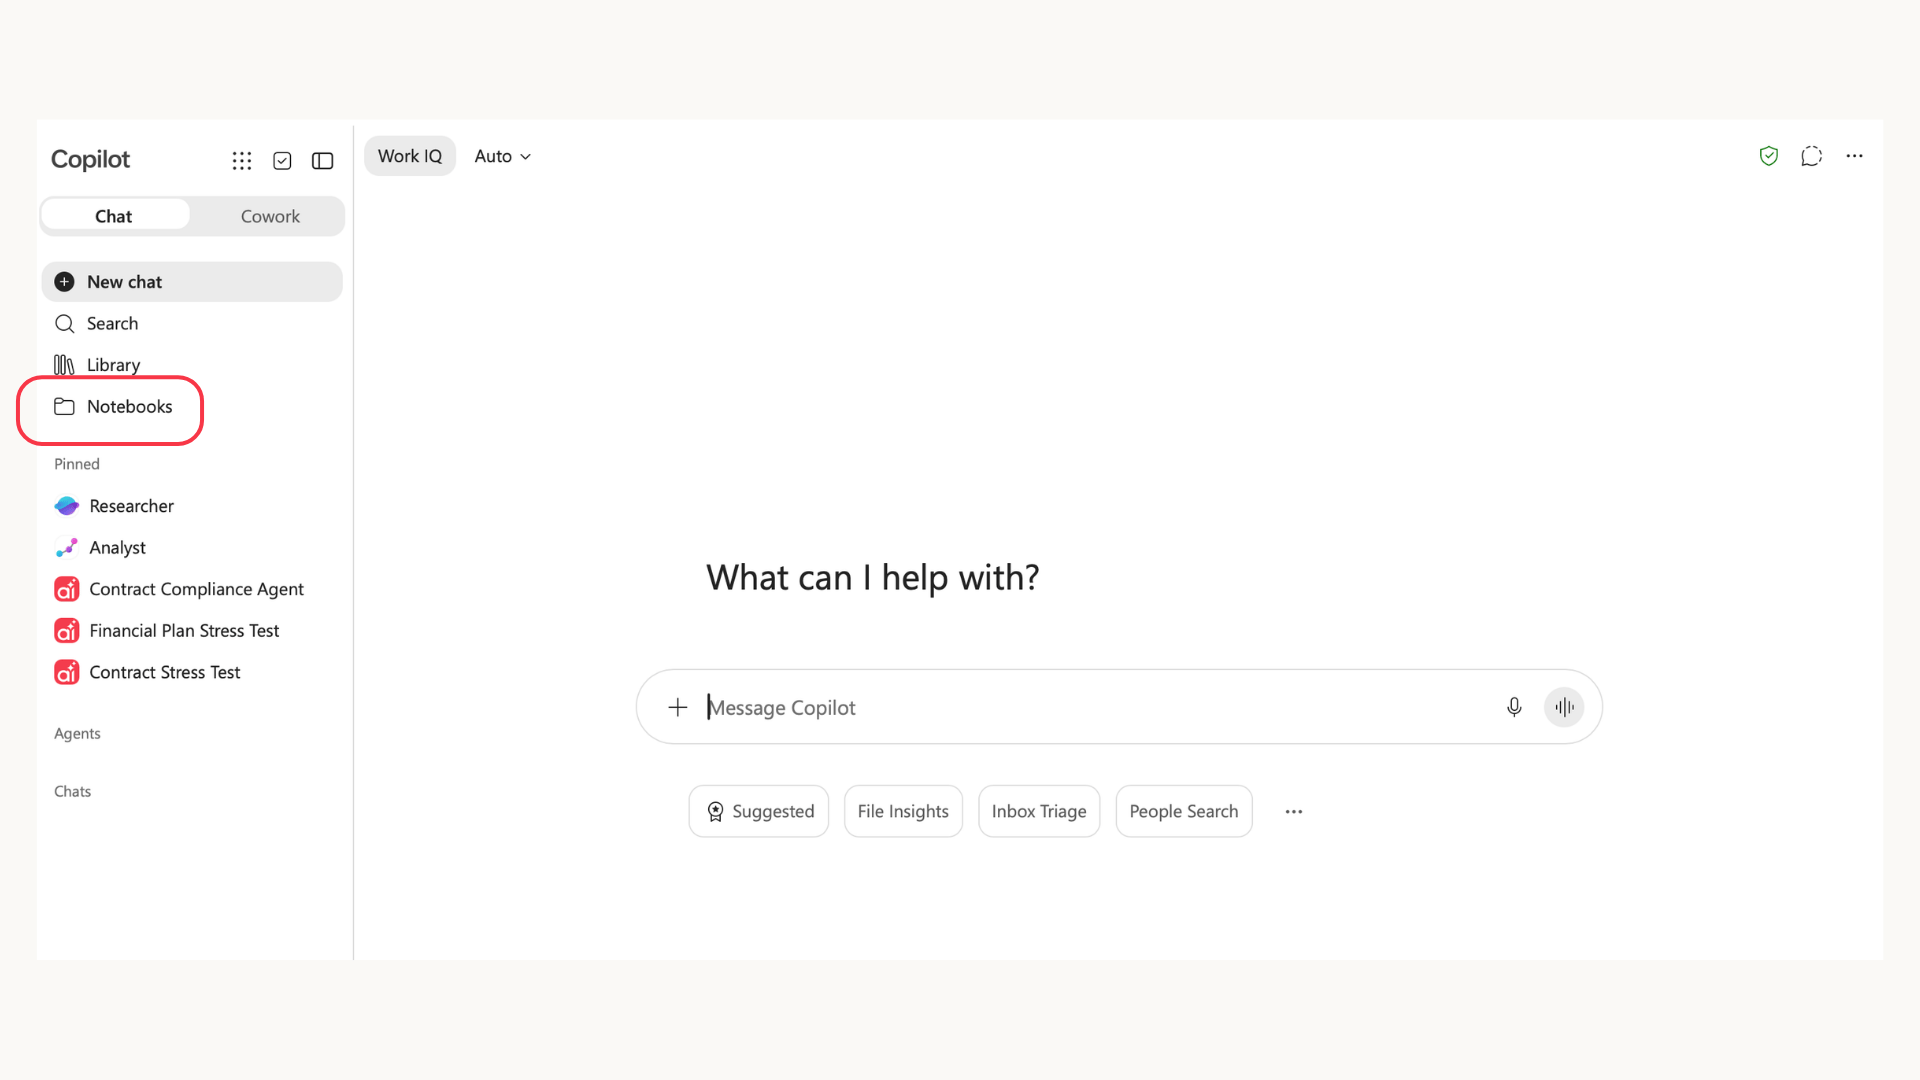
Open the Microsoft Copilot app and select Notebooks from the left-hand navigation.
If it is not visible, open the app launcher and look for it there.
Select All notebooks, then New notebook.
Give it a specific name. For this example, we will use:
"Project Nimbus"
Avoid names such as “Project information” or “My Notebook”. A clear name makes it easier to find and share later.
Step 2: Add the key project references
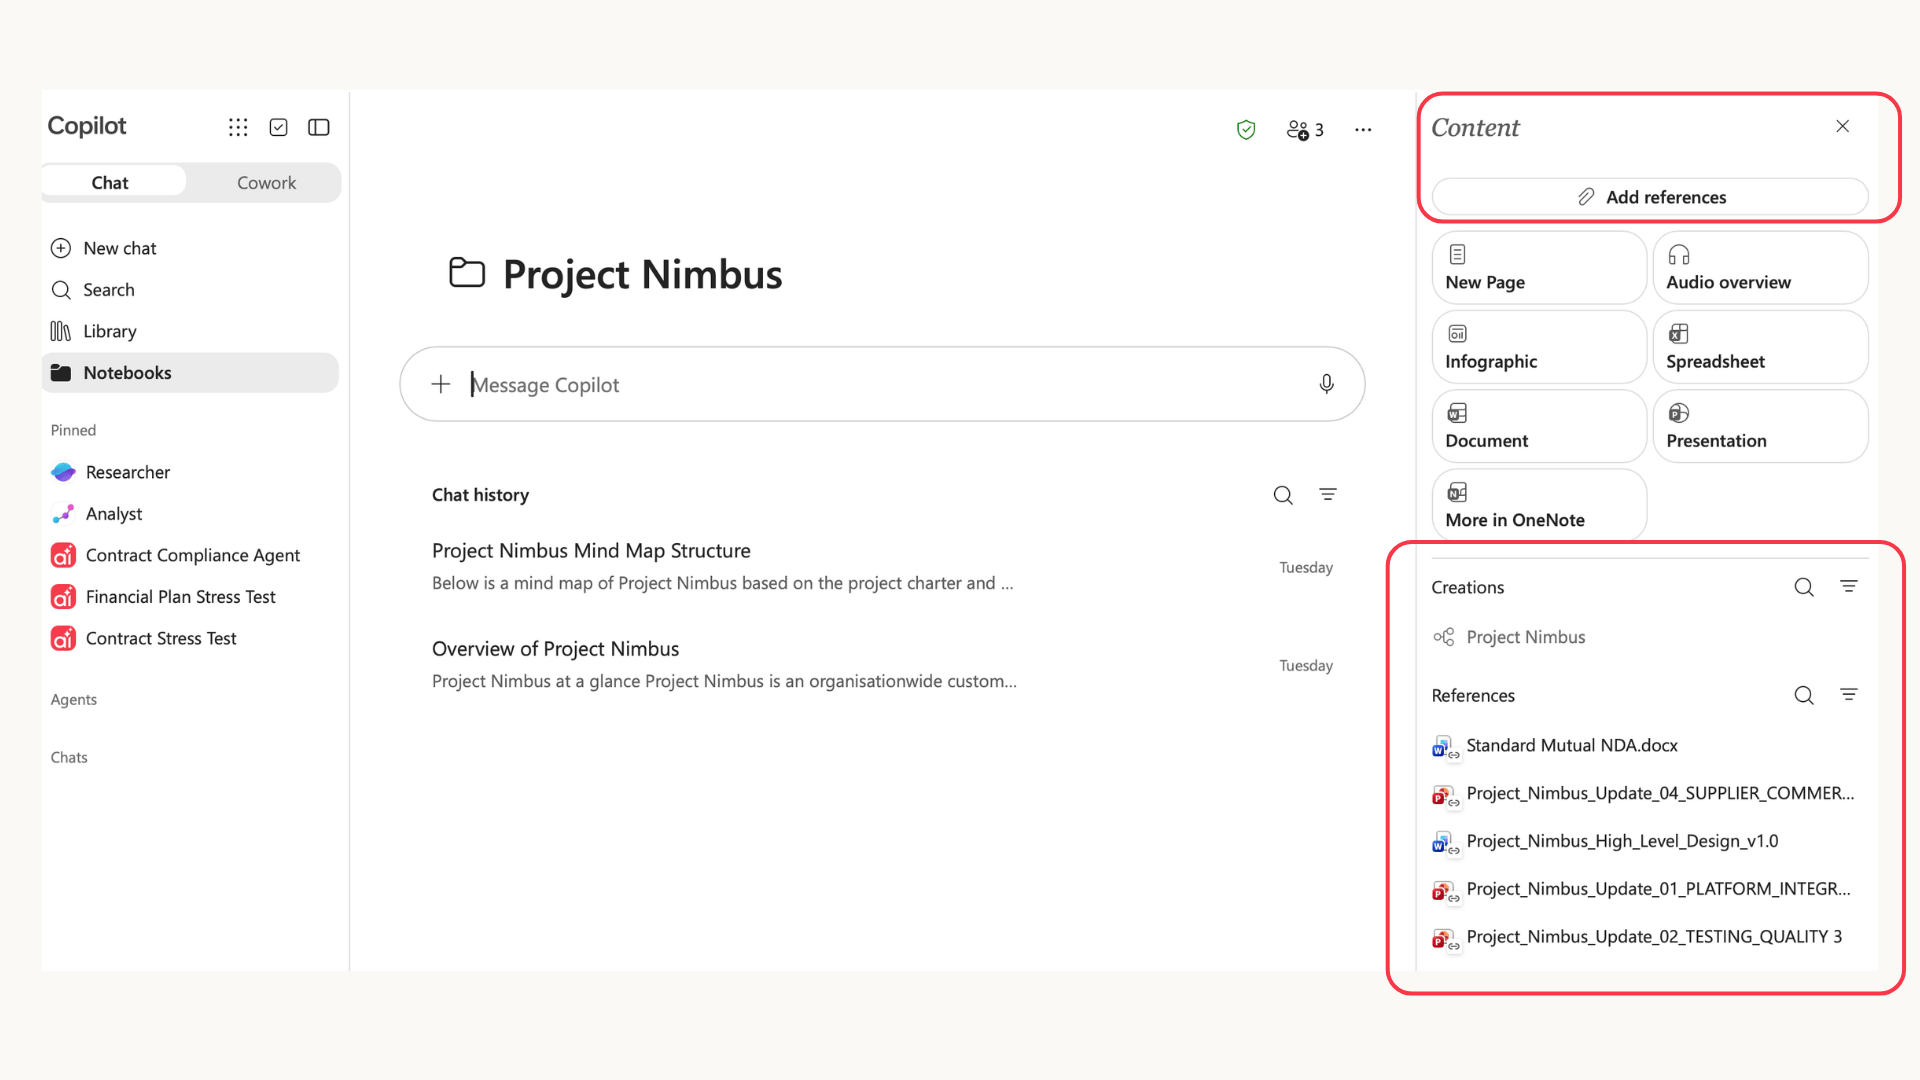
Open the Notebook give it a name and select the documents you want it to reference.
Depending on where you opened the Notebook, you may be able to add content through:
- Search
- OneDrive
- SharePoint
- Upload
- A direct link
- Drag and drop
- Use the approved charter rather than an early draft.
- Add the plan currently used by the project team.
- Use the spreadsheet that actively tracks delivery or cost.
- Include the latest formal status update.
- Add emails or meeting records containing important decisions.
Add the small set of sources you identified earlier.
Choose them carefully:
The Notebook will work from the context you give it. Missing or outdated sources can produce an incomplete briefing.
Step 3: Add instructions for Copilot
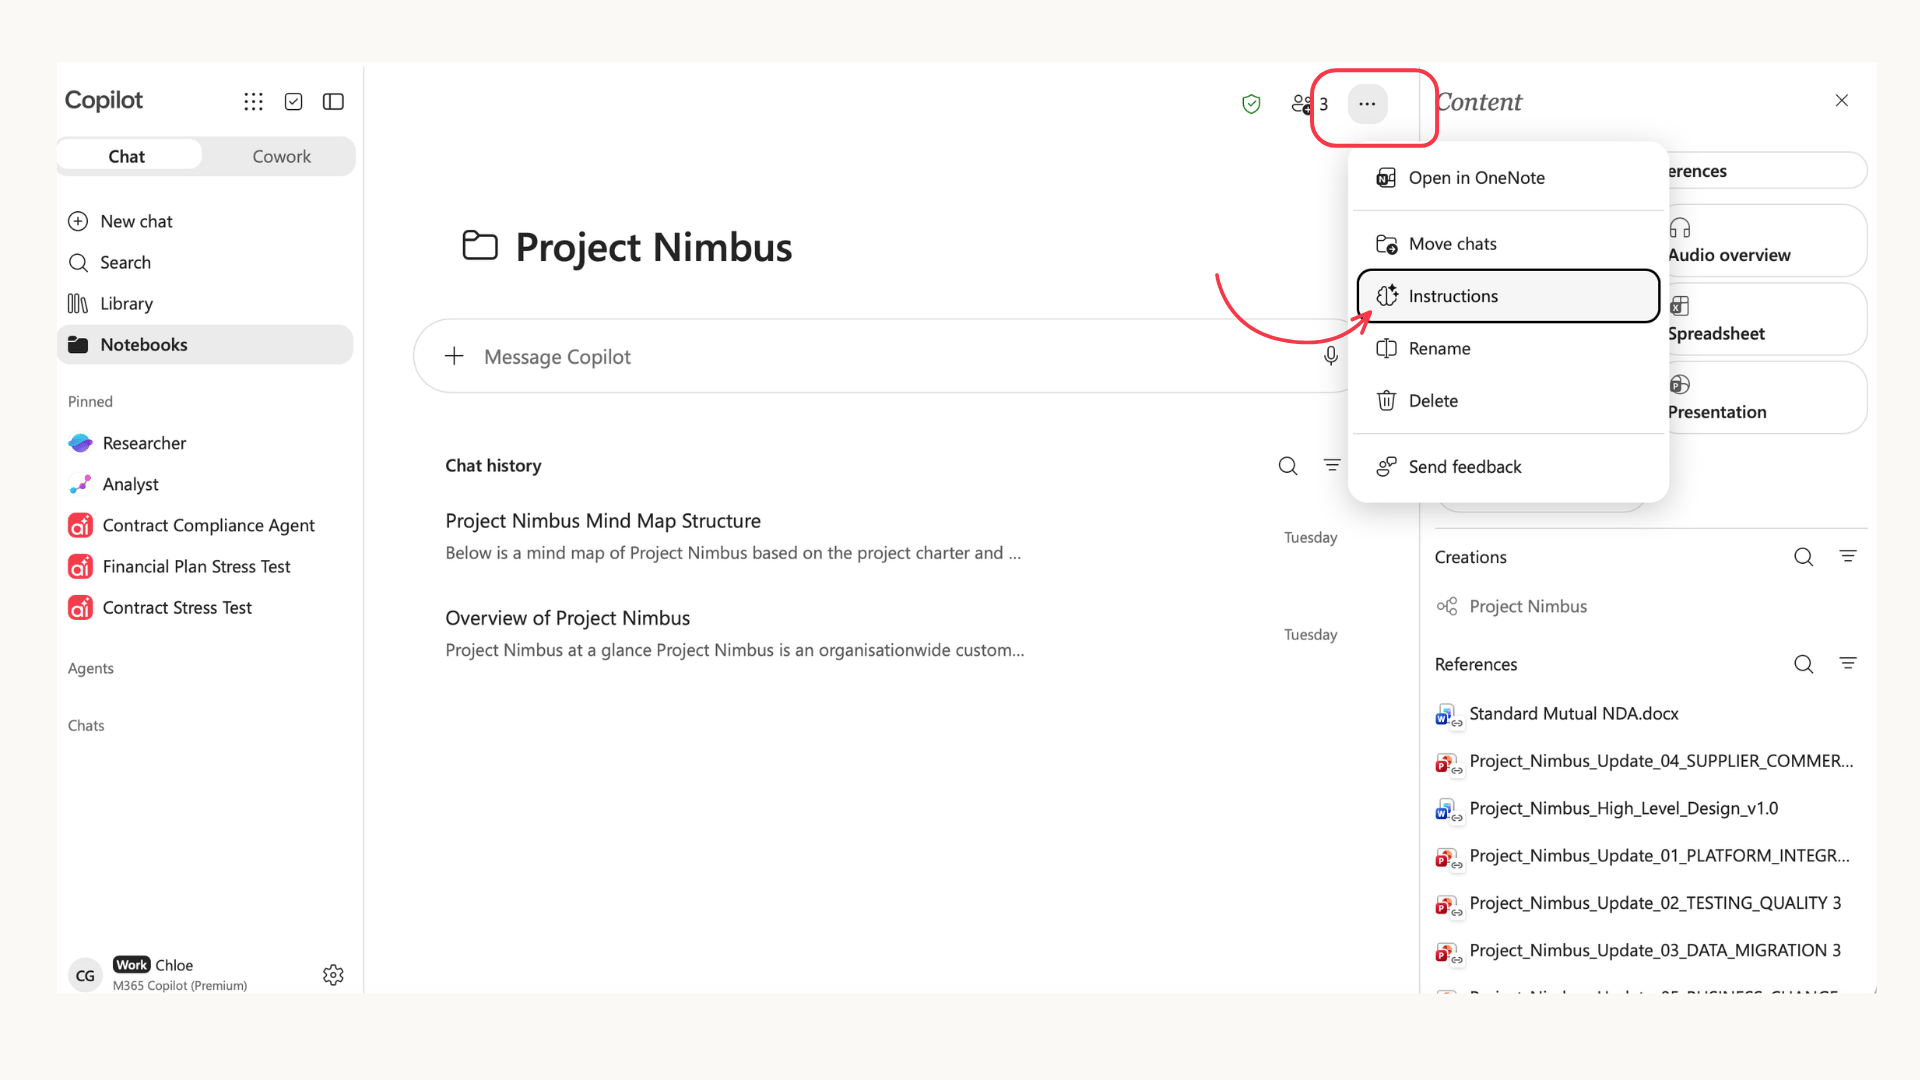
Notebook instructions tell Copilot how to use the project information and present its answers.
Open the Notebook, select More options, then Instructions.
Paste the following:
Use only the references added to this Notebook when answering questions about this project.
Separate confirmed facts from assumptions or unresolved points.
Identify the source supporting each important statement.
Do not invent missing dates, decisions, owners or figures.
Highlight contradictions between references.
State clearly when the available sources do not contain an answer.
Use clear headings and concise bullet points.
Finish with a short list of matters requiring confirmation.
Select Save.
These instructions will not replace checking the answer, but they give Copilot clear boundaries.
Step 4: Ask for a project briefing
Open the Notebook chat and enter:
Give me a briefing on (YOUR PROJECT).
Cover:
- The purpose of the project
- Its current status
- The key stakeholders mentioned in the references
- Important decisions already made
- Current risks and dependencies
- Immediate priorities and next actions
- Anything that appears unclear, outdated or contradictory
Use only the references in this Notebook. Identify the supporting source for each important point. If the references do not contain an answer, say so rather than making an assumption.
Step 5: Check the answer
Do not assume the briefing is correct because it reads well.
Choose several important points and open the cited sources. Check:
- One statement about the project’s purpose
- One date or milestone
- One confirmed decision
- One financial figure, where relevant
- One risk or dependency
- One next action
Look for common problems such as:
- An old plan being treated as current
- A proposal being presented as an approved decision
- Two separate decisions being combined
- An action being assigned to somebody who was only mentioned
- A contradiction between sources being missed
If you cannot trace a statement back to a source, ask:
Which reference supports that statement? Identify the relevant section. If none of the references support it, correct the briefing.
Step 6: Ask a narrower question
Once the general briefing is accurate, test the Notebook with something more specific.
For Project Nimbus, you could ask:
What decisions have been made about ( YOUR PROJECT NAME ) schedule? List each confirmed decision, where it appears and the supporting reference. Separate confirmed decisions from proposals that were only discussed.
Or:
Compare the latest (YOUR PROJECT NAME) plan with the most recent status update. Identify differences in dates, priorities, owners or reported progress. Cite both references for every difference.
This is a useful test because Copilot must connect information across different sources without treating everything as the same type of evidence.
Step 7: Create a visual overview
If the project is complicated, another written summary may not be the best next step.
Use the Notebook to create a mind map showing the main workstreams, risks, dependencies and decisions.
Use the visual as a starting point, then check important details against the source material.
You can also generate an audio overview if you want a short project briefing to listen to before a meeting or handover.
These formats are useful for understanding the broad structure of a project. They do not replace reading the documents behind important decisions.
Step 8: Share the Notebook
If other people need access, select Share and invite them.
Before sharing, check:
- Whether every recipient should see every referenced source
- Whether confidential documents have restricted permissions
- Whether external sharing is permitted
- Whether recipients can open the individual source files
Sharing a Notebook does not remove the need to manage access to the original project information.
*Remember that when you are a Notebook there are no permission right now so whoever you share it with, they will be able to edit references and add their own.
Keep the Notebook useful
A good project Notebook does not need hundreds of references.
Start with the sources that genuinely matter. Check the first briefing carefully, then add more information as the project develops.
For “Project Nimbus”, that means beginning with the approved charter, current plan, latest updates and records of important decisions. It does not mean adding every document with “Final”, “Latest” or “Updated” in its filename.
The aim is simple: create a project workspace with a clear scope and answers you can verify.
That is when a Copilot Notebook becomes more useful than another long chat.
For more about Notebooks and everything that Copilot can already do inside your Microsoft tenant, contact us using the form below.